내 레이아웃 코드는 다음과 같습니다.
<?xml version="1.0" encoding="utf-8"?>
<LinearLayout xmlns:android="http://schemas.android.com/apk/res/android"
    android:orientation="vertical"
    android:layout_width="fill_parent"
    android:layout_height="fill_parent">

    <TextView android:text="@string/welcome"
        android:id="@+id/TextView"
        android:layout_width="fill_parent"
        android:layout_height="wrap_content">
    </TextView>

    <LinearLayout android:id="@+id/LinearLayout"
        android:orientation="horizontal"
        android:layout_width="wrap_content"
        android:layout_height="wrap_content"
        android:gravity="bottom">

            <EditText android:id="@+id/EditText"
                android:layout_width="fill_parent"
                android:layout_height="wrap_content">
            </EditText>

            <Button android:text="@string/label_submit_button"
                android:id="@+id/Button"
                android:layout_width="wrap_content"
                android:layout_height="wrap_content">
            </Button>

    </LinearLayout>

</LinearLayout>
이 모양은 왼쪽에 있고 내가 원하는 모양은 오른쪽에 있습니다.
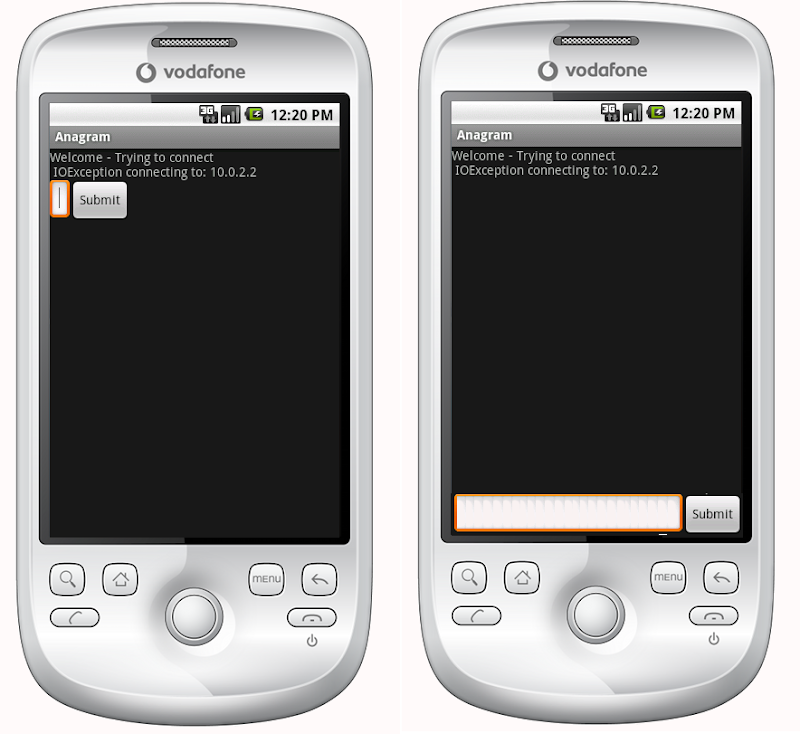

확실한 대답은 TextView를 높이에 fill_parent로 설정하는 것이지만 버튼이나 입력 필드를위한 공간이 남아 있지 않습니다.
본질적으로 문제는 제출 버튼과 텍스트 항목이 하단의 고정 높이가되고 텍스트보기가 나머지 공간을 채우길 원한다는 것입니다. 마찬가지로 수평 선형 레이아웃에서 제출 버튼이 내용을 감싸고 텍스트 항목이 나머지 공간을 채우도록하고 싶습니다.
선형 레이아웃의 첫 번째 항목에 fill_parent가 지시되면 정확히 그렇게하므로 다른 항목을위한 공간이 없습니다. 레이아웃의 나머지 항목에 필요한 최소 공간을 제외한 모든 공간을 채우기 위해 선형 레이아웃에서 첫 번째 항목을 얻는 방법은 무엇입니까?
상대 레이아웃은 실제로 대답했습니다.
    <?xml version="1.0" encoding="utf-8"?>
    <RelativeLayout
    xmlns:android="http://schemas.android.com/apk/res/android"
    android:layout_width="fill_parent"
    android:layout_height="fill_parent">

    <TextView
        android:text="@string/welcome"
        android:id="@+id/TextView"
        android:layout_width="fill_parent"
        android:layout_height="wrap_content"
        android:layout_alignParentTop="true">
    </TextView>

    <RelativeLayout
        android:id="@+id/InnerRelativeLayout"
        android:layout_width="wrap_content"
        android:layout_height="wrap_content"
        android:layout_alignParentBottom="true" >

        <Button
            android:text="@string/label_submit_button"
            android:id="@+id/Button"
            android:layout_alignParentRight="true"
            android:layout_width="wrap_content"
            android:layout_height="wrap_content">
        </Button>

        <EditText
            android:id="@+id/EditText"
            android:layout_width="fill_parent"
            android:layout_toLeftOf="@id/Button"
            android:layout_height="wrap_content">
        </EditText>

    </RelativeLayout>

</RelativeLayout>
답변
이 작업을 수행하는 현대적인 방법은 ConstraintLayout 을 사용하여 뷰의 하단을 ConstraintLayout의 하단으로 제한하는 것입니다.app:layout_constraintBottom_toBottomOf="parent"
아래 예제는 화면의 끝과 아래쪽에 정렬되는 FloatingActionButton을 만듭니다.
<android.support.constraint.ConstraintLayout
   xmlns:android="http://schemas.android.com/apk/res/android"
   xmlns:app="http://schemas.android.com/apk/res-auto"
   xmlns:tools="http://schemas.android.com/tools"
   android:layout_height="match_parent"
   android:layout_width="match_parent">

<android.support.design.widget.FloatingActionButton
    android:layout_height="wrap_content"
    android:layout_width="wrap_content"

    app:layout_constraintBottom_toBottomOf="parent"

    app:layout_constraintEnd_toEndOf="parent" />

</android.support.constraint.ConstraintLayout>
참고로 이전 답변을 유지하겠습니다.
ConstraintLayout을 도입하기 전에는 상대적 레이아웃 이었습니다.
전체 화면을 채우는 상대 레이아웃이있는 경우 android:layout_alignParentBottom버튼을 화면 맨 아래로 이동하는 데 사용할 수 있어야합니다 .
맨 아래의 뷰가 상대 레이아웃으로 표시되지 않으면 위의 레이아웃이 모든 공간을 차지할 수 있습니다. 이 경우 먼저 레이아웃 파일에서 맨 아래에있는 뷰를 배치하고을 사용하여 뷰 위에 나머지 레이아웃을 배치 할 수 있습니다 android:layout_above. 이렇게하면 하단 뷰가 필요한만큼의 공간을 차지할 수 있으며 나머지 레이아웃은 나머지 모든 화면을 채울 수 있습니다.
답변
A의 ScrollView(가)로이 아니라 작업을 수행 RelativeLayout하고자 다음 오버랩에 어떤 ScrollView페이지 하단에.
동적으로 스트레칭을 사용하여 수정했습니다 FrameLayout.
<ScrollView
    xmlns:android="http://schemas.android.com/apk/res/android"
    android:layout_height="match_parent"
    android:layout_width="match_parent"
    android:fillViewport="true">
    <LinearLayout
        android:id="@+id/LinearLayout01"
        android:layout_width="match_parent"
        android:layout_height="match_parent"
        xmlns:android="http://schemas.android.com/apk/res/android"
        android:orientation="vertical">

                <!-- content goes here -->

                <!-- stretching frame layout, using layout_weight -->
        <FrameLayout
            android:layout_width="match_parent"
            android:layout_height="0dp"
            android:layout_weight="1">
        </FrameLayout>

                <!-- content fixated to the bottom of the screen -->
        <LinearLayout
            android:layout_width="match_parent"
            android:layout_height="wrap_content"
            android:orientation="horizontal">
                                   <!-- your bottom content -->
        </LinearLayout>
    </LinearLayout>
</ScrollView>
답변
선형 레이아웃 내에 상대 레이아웃을 중첩하여 초기 선형 레이아웃을 유지할 수 있습니다.
<LinearLayout
    android:orientation="vertical"
    android:layout_width="fill_parent"
    android:layout_height="fill_parent">

    <TextView android:text="welcome"
        android:id="@+id/TextView"
        android:layout_width="fill_parent"
        android:layout_height="wrap_content">
    </TextView>

    <RelativeLayout
        android:layout_width="match_parent"
        android:layout_height="match_parent">
        <Button android:text="submit"
            android:id="@+id/Button"
            android:layout_width="wrap_content"
            android:layout_height="wrap_content"
            android:layout_alignParentBottom="true"
            android:layout_alignParentRight="true">
        </Button>
        <EditText android:id="@+id/EditText"
            android:layout_width="match_parent"
            android:layout_height="wrap_content"
            android:layout_toLeftOf="@id/Button"
            android:layout_alignParentBottom="true">
        </EditText>
    </RelativeLayout>
</LinearLayout>
답변
위의 대답 (Janusz)은 꽤 정확하지만 개인적으로 RelativeLayouts와 100 % 불편 함을 느끼지 않으므로 다음과 같이 빈 TextView ‘filler’를 선호합니다.
<!-- filler -->
<TextView android:layout_height="0dip"
          android:layout_width="fill_parent"
          android:layout_weight="1" />
화면 하단에있는 요소 앞에
답변
LinearLayout 또는 ScrollView를 사용 하여이 작업을 수행 할 수도 있습니다. 때로는 RelativeLayout보다 구현하기가 더 쉽습니다. 화면 하단에 정렬하려는 뷰 앞에 다음 뷰를 추가해야합니다 .
<View
    android:layout_width="wrap_content"
    android:layout_height="0dp"
    android:layout_weight="1" />
빈 공간을 채우고 다음 뷰를 화면 맨 아래로 밀어서 빈 뷰를 만듭니다.
답변
이것은 또한 작동합니다.
<LinearLayout
    android:id="@+id/linearLayout4"
    android:layout_width="wrap_content"
    android:layout_height="fill_parent"
    android:layout_below="@+id/linearLayout3"
    android:layout_centerHorizontal="true"
    android:orientation="horizontal"
    android:gravity="bottom"
    android:layout_alignParentBottom="true"
    android:layout_marginTop="20dp"
>

    <Button
        android:id="@+id/button1"
        android:layout_width="wrap_content"
        android:layout_height="wrap_content"
        android:text="Button"

    />

    <Button
        android:id="@+id/button2"
        android:layout_width="wrap_content"
        android:layout_height="wrap_content"
        android:text="Button"


    />

</LinearLayout>

답변
1. ConstraintLayout루트 레이아웃에서 사용
그리고 app:layout_constraintBottom_toBottomOf="parent"화면 하단에 레이아웃이 있도록 설정 하십시오.
<LinearLayout
    android:id="@+id/LinearLayout"
    android:layout_width="match_parent"
    android:layout_height="wrap_content"
    android:orientation="horizontal"
    app:layout_constraintBottom_toBottomOf="parent">
</LinearLayout>
2. FrameLayout루트 레이아웃에서 사용
android:layout_gravity="bottom"레이아웃에서 설정 하십시오.
<LinearLayout
    android:id="@+id/LinearLayout"
    android:layout_width="match_parent"
    android:layout_height="wrap_content"
    android:layout_gravity="bottom"
    android:orientation="horizontal">
</LinearLayout>
3. LinearLayout루트 레이아웃에서 사용 ( android:orientation="vertical")
(1) 레이아웃 android:layout_weight="1"상단에 레이아웃 을 설정하십시오.
<TextView
    android:id="@+id/TextView"
    android:layout_width="match_parent"
    android:layout_height="0dp"
    android:layout_weight="1"
    android:text="welcome" />
(2) 자녀 LinearLayout를android:layout_width="match_parent" android:layout_height="match_parent" android:gravity="bottom"
주요 속성은 ndroid:gravity="bottom"입니다.
<LinearLayout
    android:id="@+id/LinearLayout"
    android:layout_width="match_parent"
    android:layout_height="match_parent"
    android:gravity="bottom"
    android:orientation="horizontal">
</LinearLayout>RelativeLayout루트 레이아웃에서 사용
그리고 설정 android:layout_alignParentBottom="true"화면의 하단에있는 레이아웃을 수 있도록
<LinearLayout
    android:id="@+id/LinearLayout"
    android:layout_width="match_parent"
    android:layout_height="wrap_content"
    android:layout_alignParentBottom="true"
    android:orientation="horizontal">
</LinearLayout>
산출
